Hello, hello! Welcome to the info page for my newlivestream series. I’ll be using my Spellbinders Crafty Advent Calendar from 2025 to extend the fun all year long in 2026. I’ll have a live stream on the 4th Friday of every month at 4pm Pacific time. The stream will last between and hour and an hour and a half. This series is also a craft-along!
I will preplan a project, post sneak peeks and post of things you can prep ahead of time if you want to craft live with me. I’ll try to use the advent supplies in a way that may not be super obvious. That way you can get more ideas on using your advent goodies. Hope you will join me.
April 2026
The next live will be April 17, 2026 at 4pm Pacific Time. Note that this is a change of time due to scheduling conflict. Join the live now or watch the replay.
Project
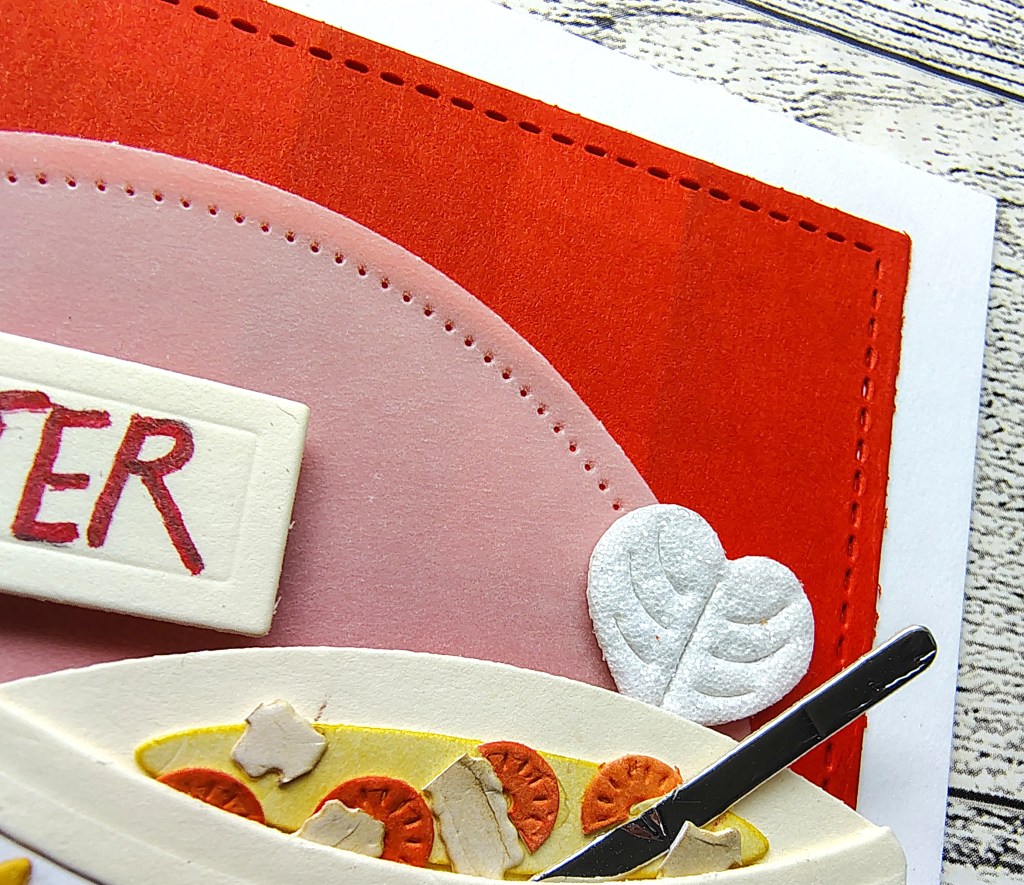
This month we will be creating a Get Well inspired card. There is a fun technique using a basic die. Then as usual we will alter up pieces to create new images.
I will explain several options/alternatives during the live. And remember—you can always use the colors you love most.
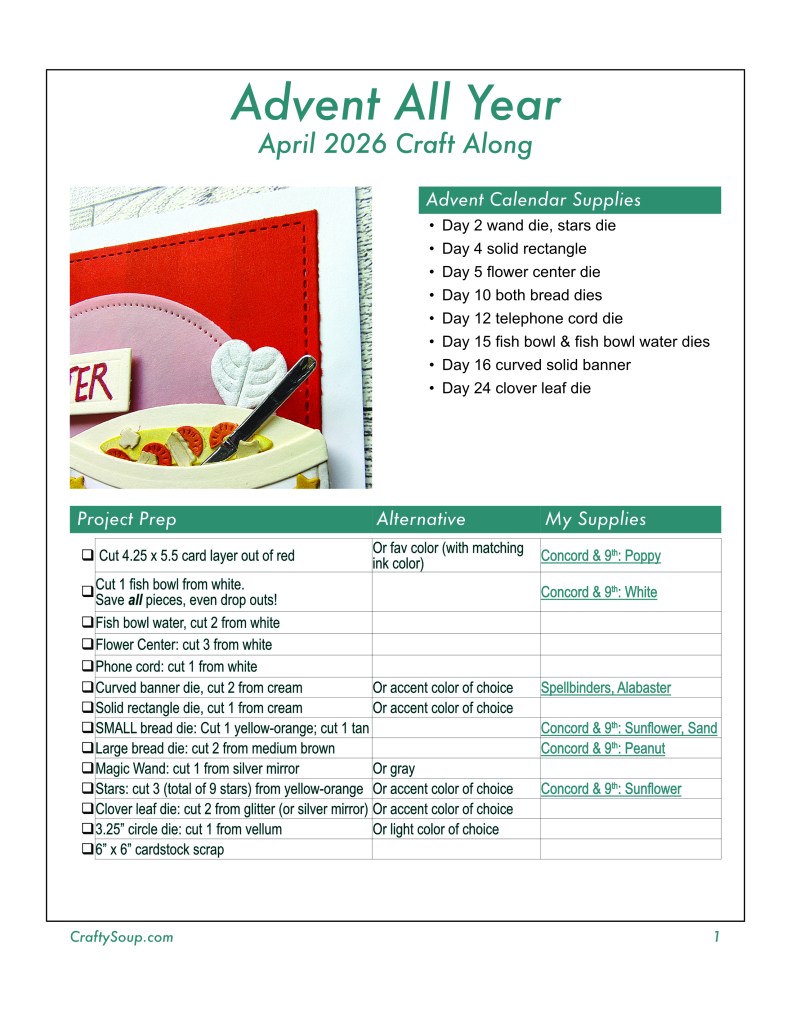
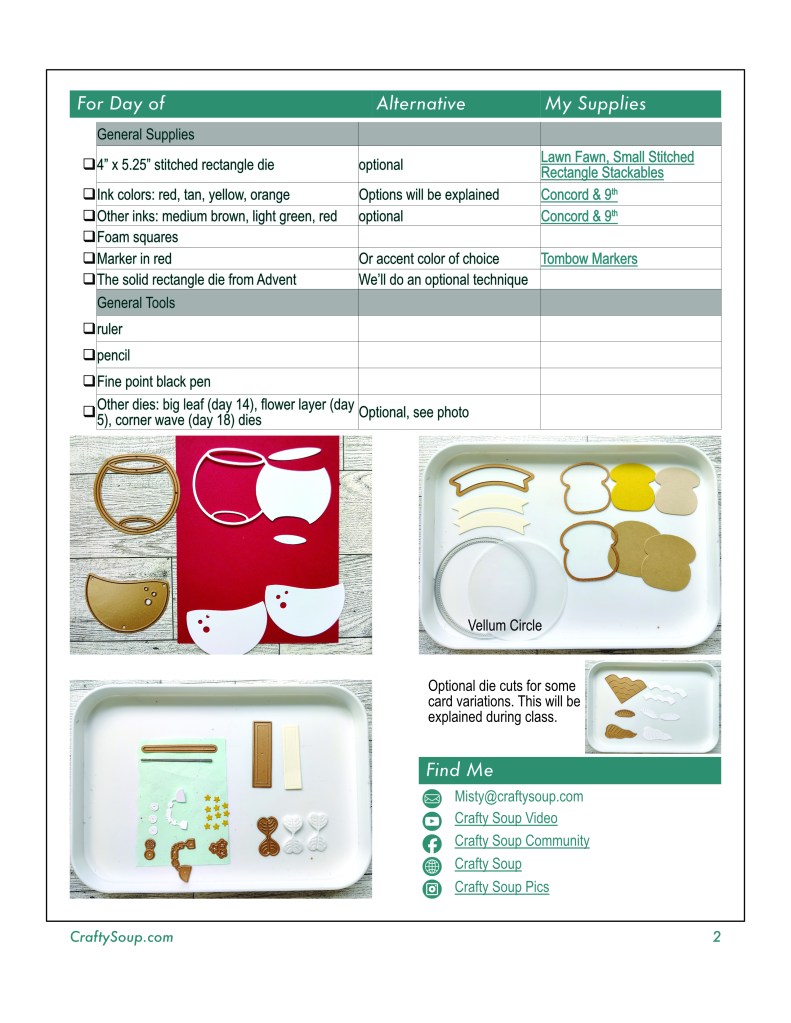
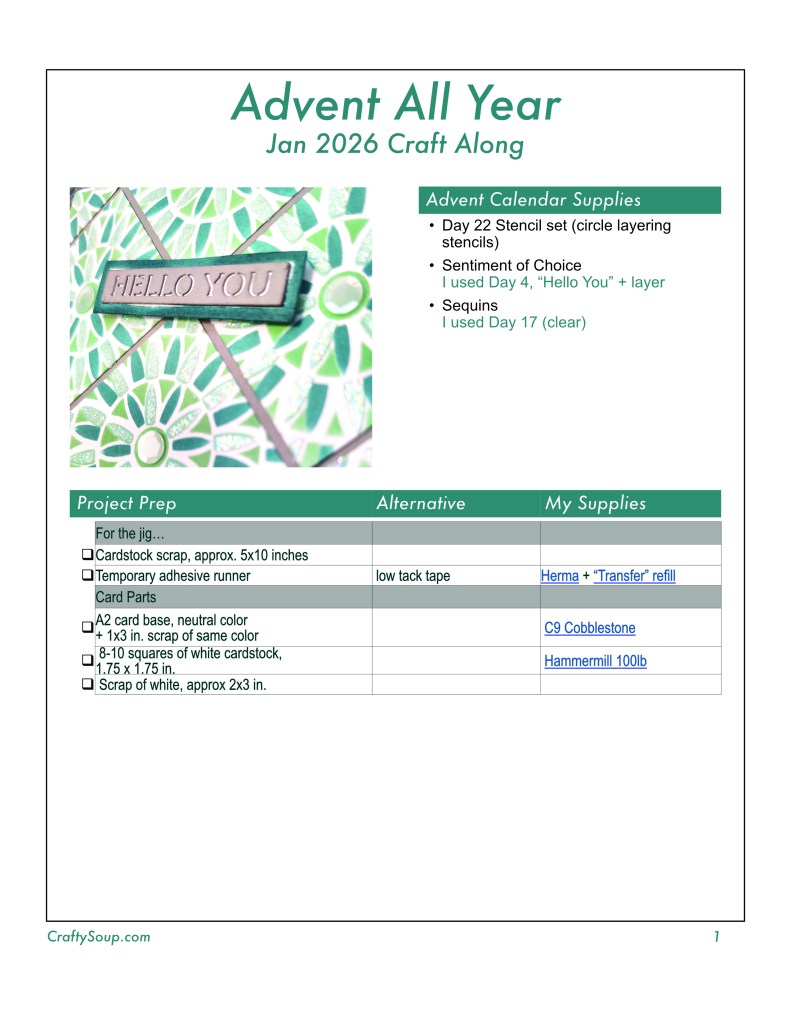
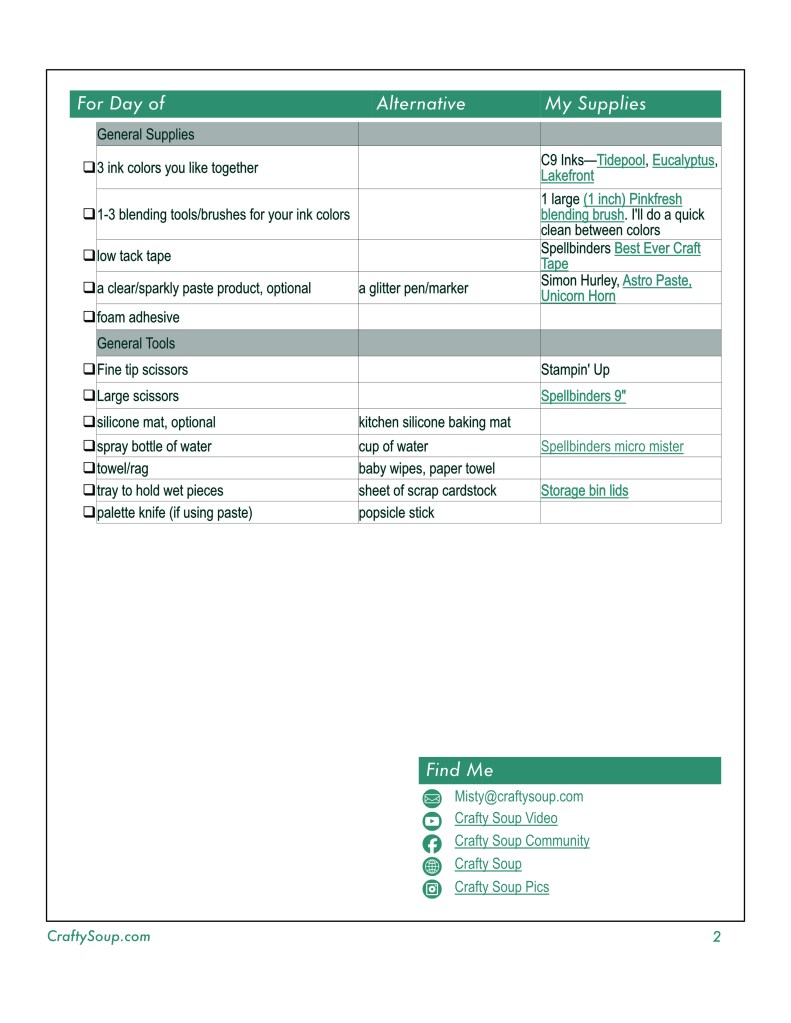
If you want to craft along with me, here is a preview of the preparation list. Click this link to download the instructions. A zip file will download. The folder includes PDF and JPG files.
If you have any questions or comments, you can message me here on the blog from the Contact tab. Or you can email me by using misty at craftysoup dot com. I’ll do my best to get back to you in a timely fashion. Hope to see you on the live!
I love kit building and that is why I am on the design team for the Counterfeit Kit Challenge project. We take an inspiration kit each month and proceed to replicate it, or as we say, counterfeit it. This is a free, friendly group that helps inspire you to use up supplies you already own. We are not about needing to buy the latest and greatest thing (though we won’t stop you if you enjoy new crafty goodies😉 ).
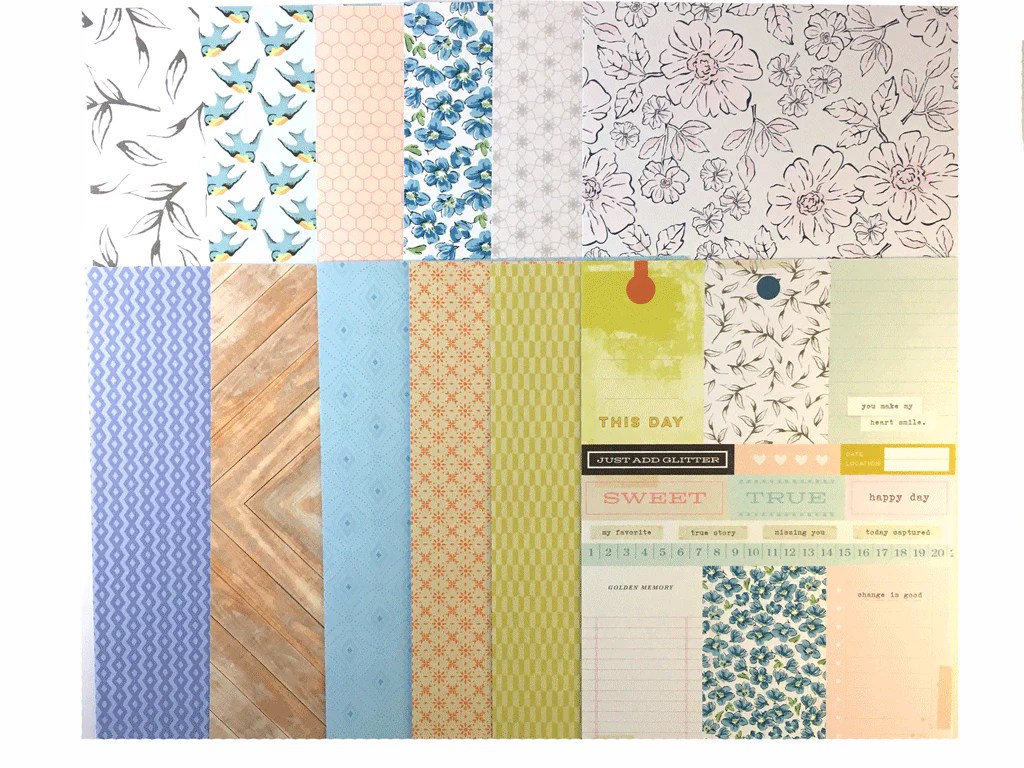
Welcome to a new month of kit building. Julene is our hostess this time. She chose a set of papers the and coordinating supplies from Citrus Twist Kits! Before we dive into the details of this kit, let’s give a warm welcome to our guest designer this month, Diana Vanderleist. She has been scrapbooking for more than three decades! What an amazing accomplishment.
So let’s move on with our kit. Here are a few looks at what we have in store this time around.
I loved the mellow color and patterns of the papers. That woodgrain paper is right up my alley! So that is exactly where I started my kit build. I knew I wanted to keep my choices under control. I managed that with my papers. But as you’ll see, my embellishment choices went way overboard, LOL. So here are the papers.
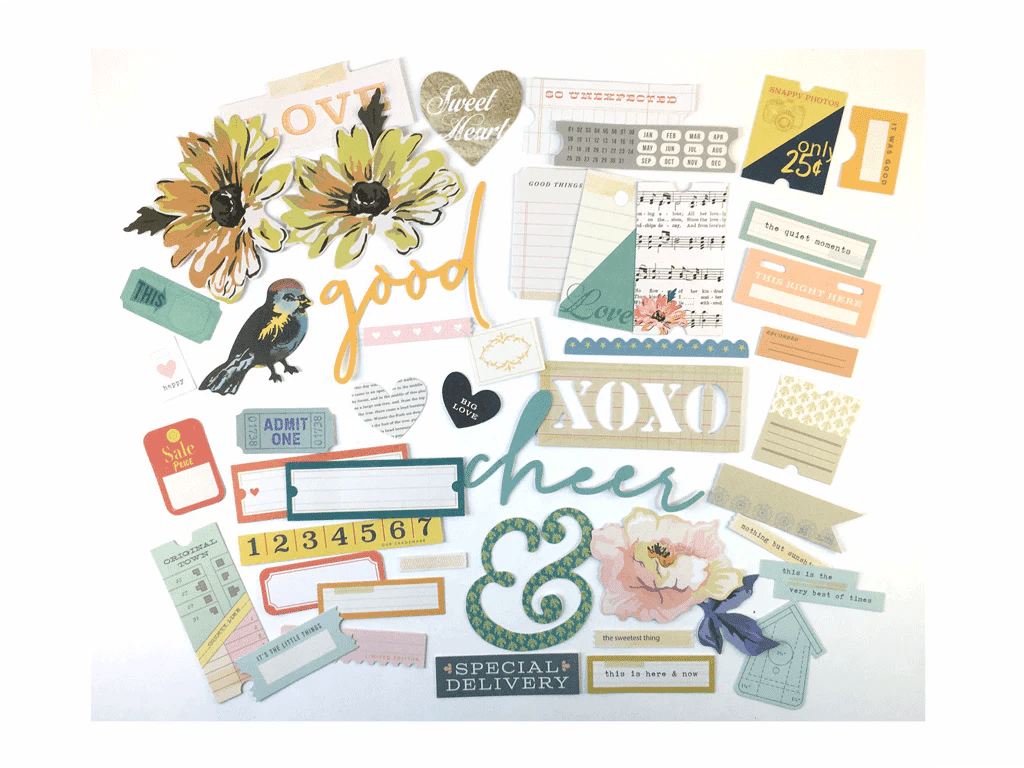
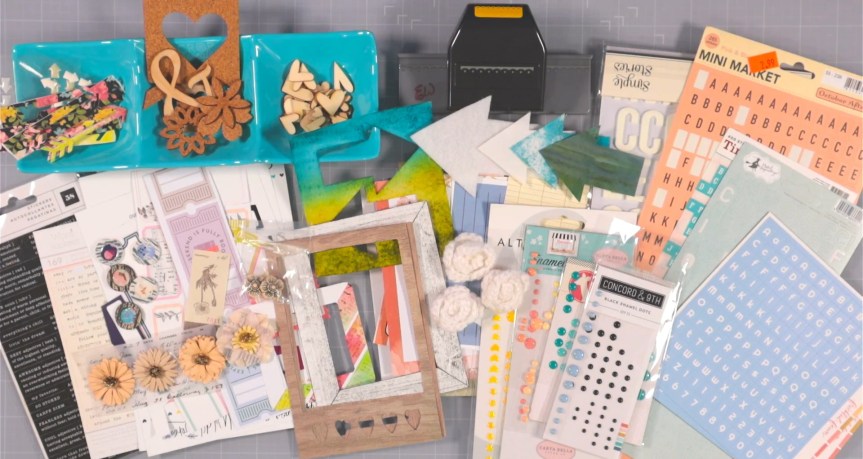
And here are the embellishments…
I was inspired to pull lots of diecuts, arrows, hearts and flowers from a peek at the kits simple embellishment selection. Plus I even spied a little bit of scalloped edges so I added a border punch to my kit. Even small things can be inspiring!
Don’t forget that each month I also create my own elements to add into my kit. Of course these are inspired by the original kit, but often have a twist of their own. So don’t miss what I will make in just a couple of days. I’m loving my ideas this time.
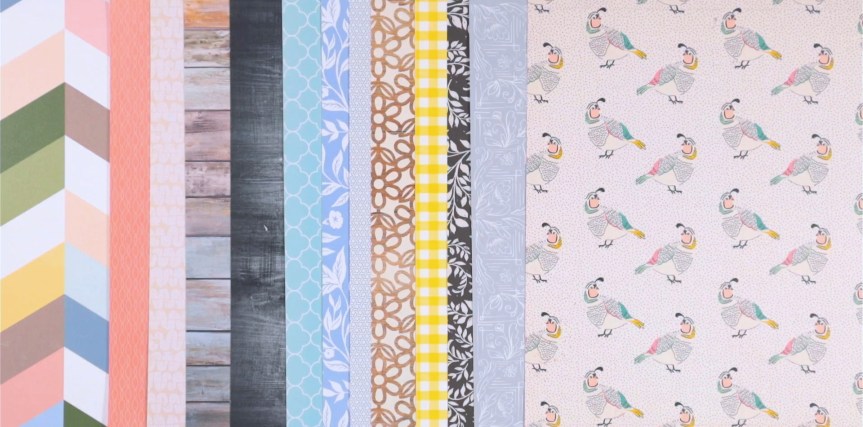
There is a tradition over at CKC of titling our kits just like companies do. When I went searching for a bird pattern paper I found multiple options which was unexpected. With that I’m calling my kit…
Bird Watch
If you want more details on my kit building thought process, check out my kit build video.
I hope you can follow along with the other designers and see how they interpreted their own kits.
I have a free download “worksheet” to help guide you through your own kit build process. It is a printable pdf and there are two worksheets per letter size page. Have fun kit building!
Don’t forget to show off your stuff over on the CKC Facebook group, or tag us on Instagram @counterfeitkitchallenge or use #counterfeitkitchallenge.
I’ll be back on the 4th, for our Product Forgeries. Until then, have an artful day!
Hello, hello! Welcome to the info page for my new livestream series. I’ll be using my Spellbinders Crafty Advent Calendar from 2025 to extend the fun all year long in 2026. I’ll have a live stream on the 4th Friday of every month at 4pm Pacific time. The stream will last between and hour and an hour and a half. This series is also a craft-along!
I will preplan a project, post sneak peeks and post of things you can prep ahead of time if you want to craft live with me. I’ll try to use the advent supplies in a way that may not be super obvious. That way you can get more ideas on using your advent goodies. Hope you will join me.
Date
The next live will be March 27, 2026 at 4pm Pacific Time. Join the live now or watch the replay.
March Project
This month we will be creating a lovely lady to adorn our card. She is also interactive! While I went all in on pink, feel free to use your own color palette. Believe it or not I’m not really a pink girl. LOL.
There is a bit of prep if you want to craft live with me. The “hair” can be done later if you want to reduce the amount of die cutting. However, I find if you cut one “hair” piece each time you cut something else, the work isn’t that bad. We will do some die cutting on the day of the event as well. I’ve noted in the preparation instructions what you need for now and what we will do live.
If you want to craft along with me, here is a preview of the preparation list. Click this link to download the instructions. A zip file will download. The folder includes PDF and JPG files.
If you have any questions or comments, you can message me here on the blog from the Contact tab. Or you can email me by using misty at craftysoup dot com. I’ll do my best to get back to you in a timely fashion. Hope to see you on the live!
I love kit building and that is why I am on the design team for the Counterfeit Kit Challenge project. We take an inspiration kit each month and proceed to replicate it, or as we say, counterfeit it. This is a free, friendly group that helps inspire you to use up supplies you already own. We are not about needing to buy the latest and greatest thing (though we won’t stop you if you enjoy new crafty goodies😉 ).
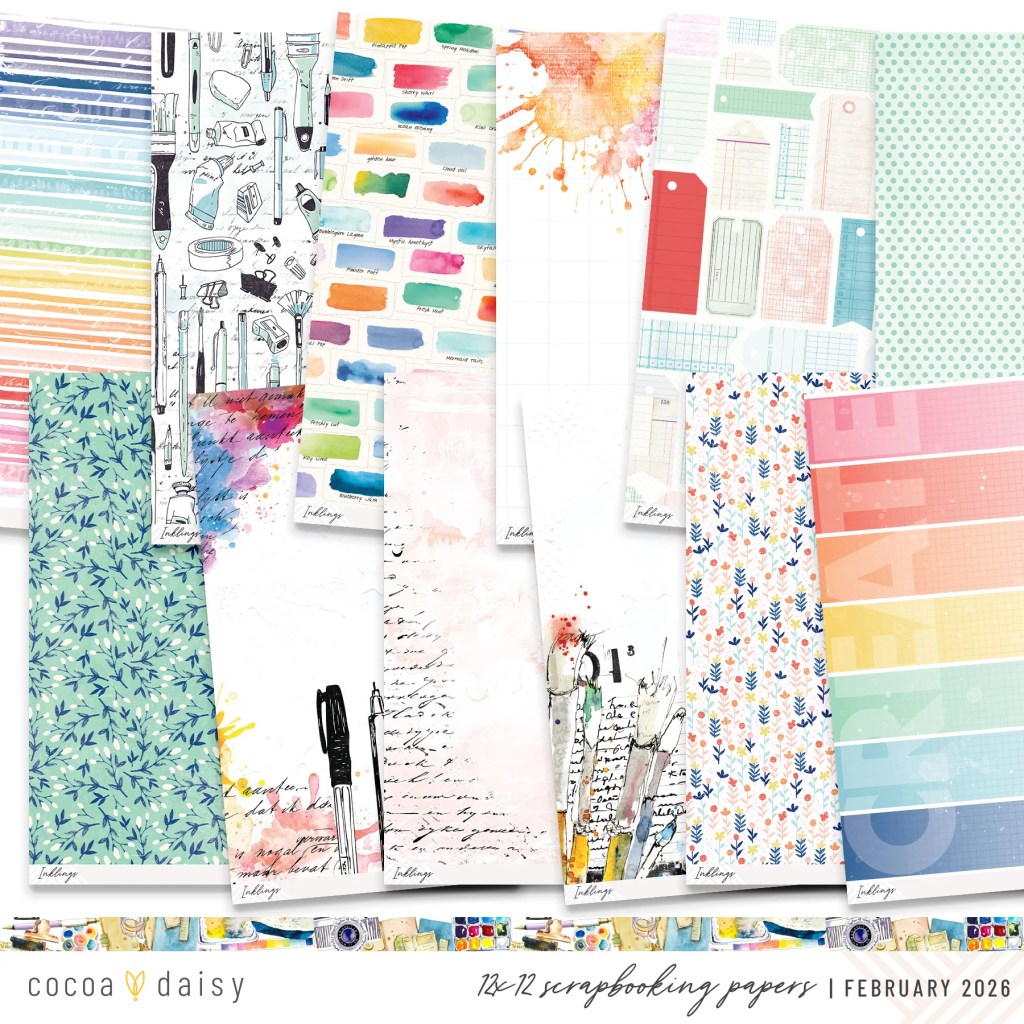
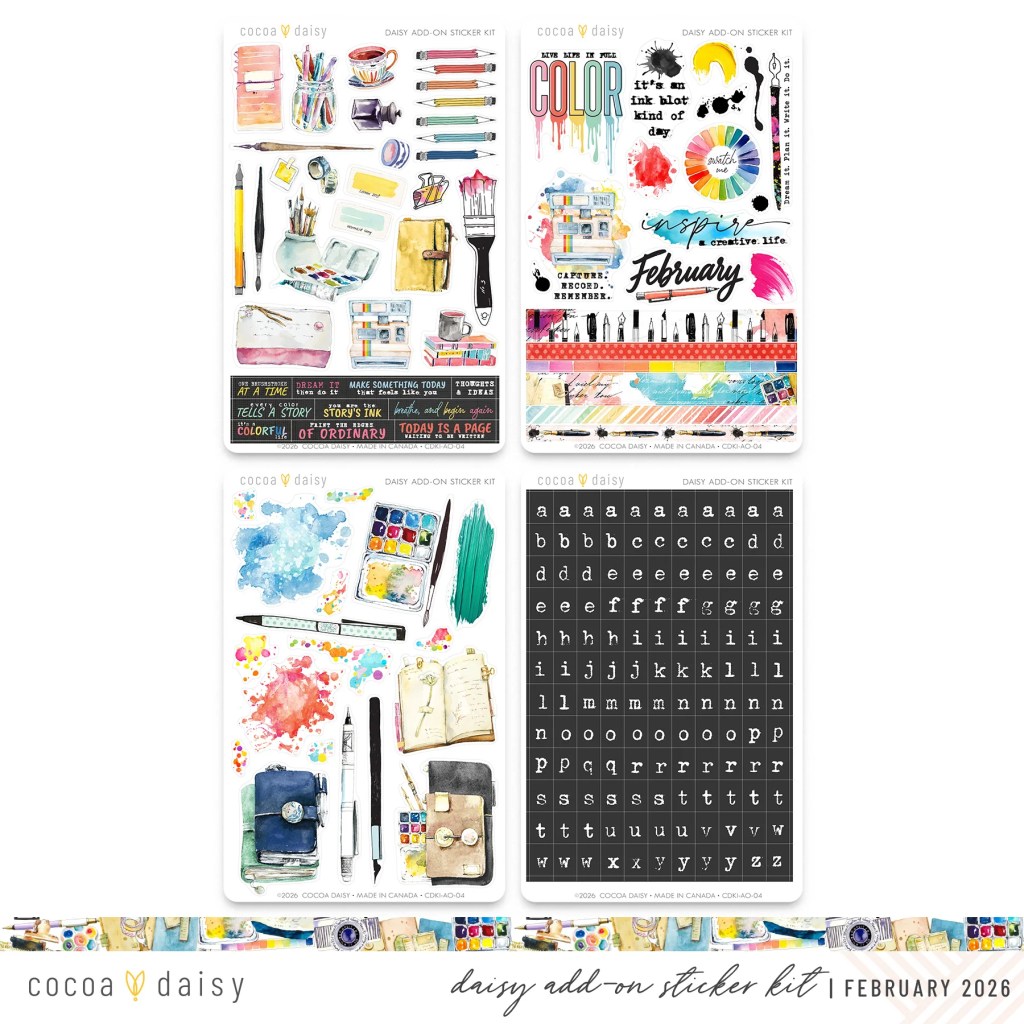
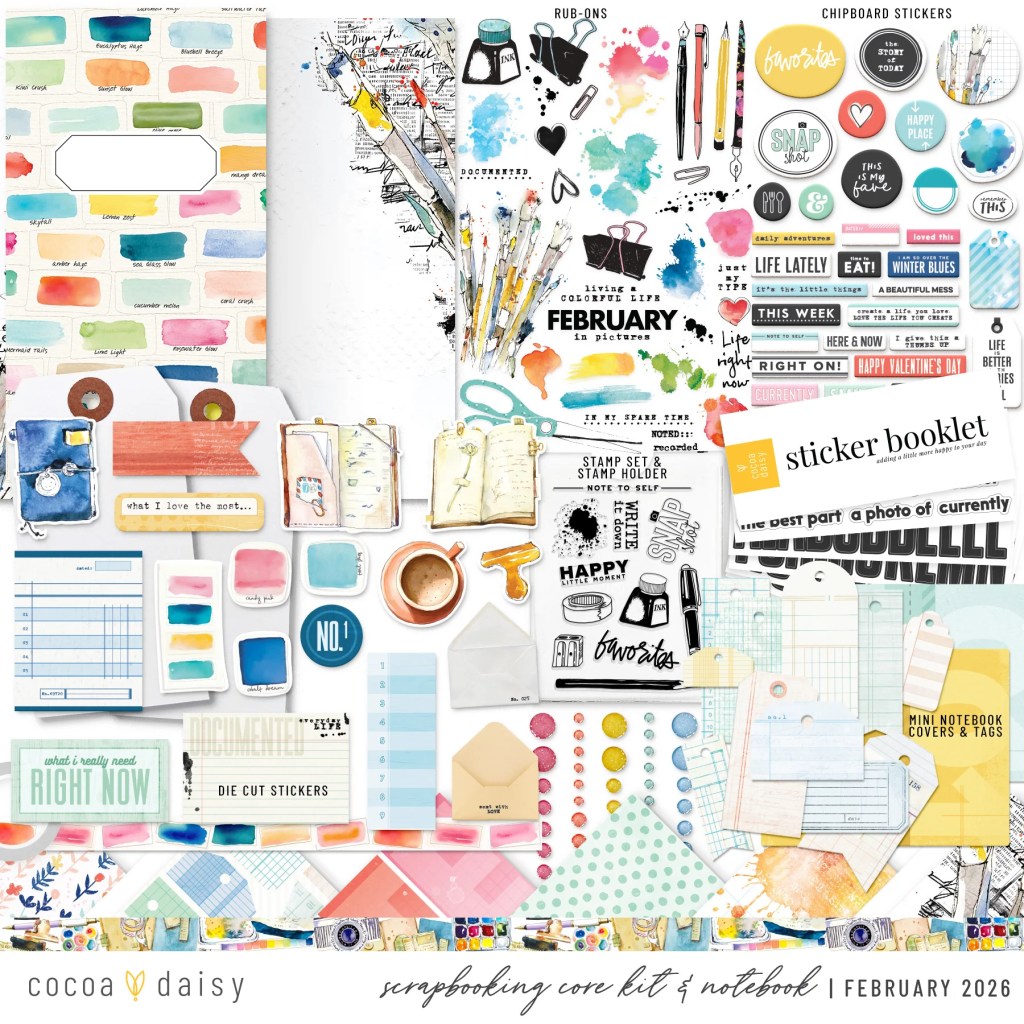
Welcome to a new month of kit building. Team lead Tara is our hostess this time! She chose the Inklings, Feb ’26 kit from Cocoa Daisy. to inspire us. Before we dive into the details of this kit, let’s give a warm welcome to our guest designer this month, Neyla. You can find her on Instagram or on YouTube.
So let’s move on with our kit. Here are a few looks at what we have in store this time around.
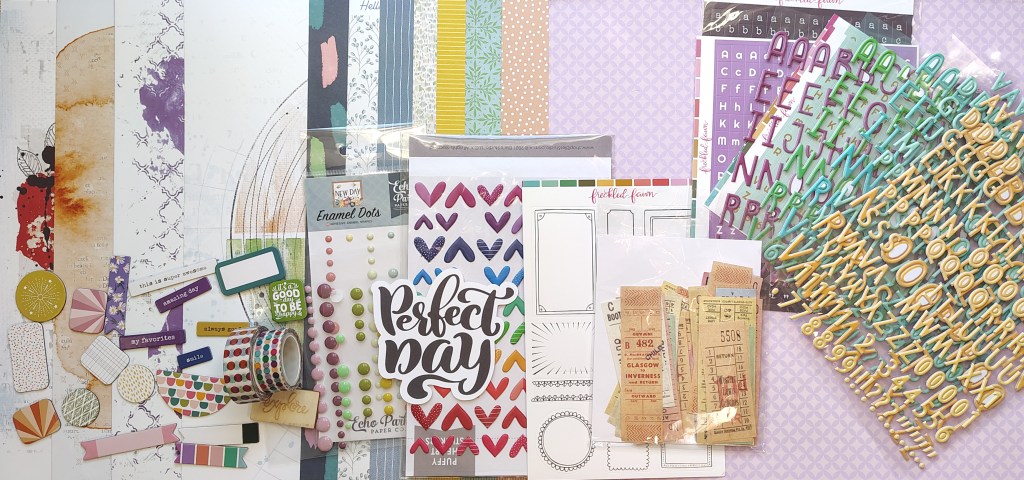
I need a small kit this month so I focused on just a few elements. I wanted to follow some of the color pops, add in some mixed media, plus include really non-themed embellishments. Here is what I came up with. I was going to add in a mixed-media friendly stamp set, but forgot! No worries, I can just grab that off my shelf and use it anyway.
Don’t forget that each month I also create my own elements to add into my kit. Of course these are inspired by the original kit, but often have a twist of their own. So don’t miss what I will make in just a couple of days. I’m loving my ideas this time.
There is a tradition over at CKC of titling our kits just like companies do. So I’m calling mine…
Media Pop
If you want more details on my kit building thought process, check out my kit build video.
I hope you can follow along with the other designers and see how they interpreted their own kits.
I have a free download “worksheet” to help guide you through your own kit build process. It is a printable pdf and there are two worksheets per letter size page. Have fun kit building!
Don’t forget to show off your stuff over on the CKC Facebook group, or tag us on Instagram @counterfeitkitchallenge or use #counterfeitkitchallenge.
I’ll be back on the 4th, for our Product Forgeries. Until then, have an artful day!
Hello, hello! Welcome to the info page for my newlivestream series. I’ll be using my Spellbinders Crafty Advent Calendar from 2025 to extend the fun all year long in 2026. I’ll have a live stream on the 4th Friday of every month at 4pm Pacific time. The stream will last between and hour and an hour and a half. This series is also a craft-along!
I will preplan a project, post sneak peeks and post of things you can prep ahead of time if you want to craft live with me. I’ll try to use the advent supplies in a way that may not be super obvious. That way you can get more ideas on using your advent goodies. Hope you will join me.
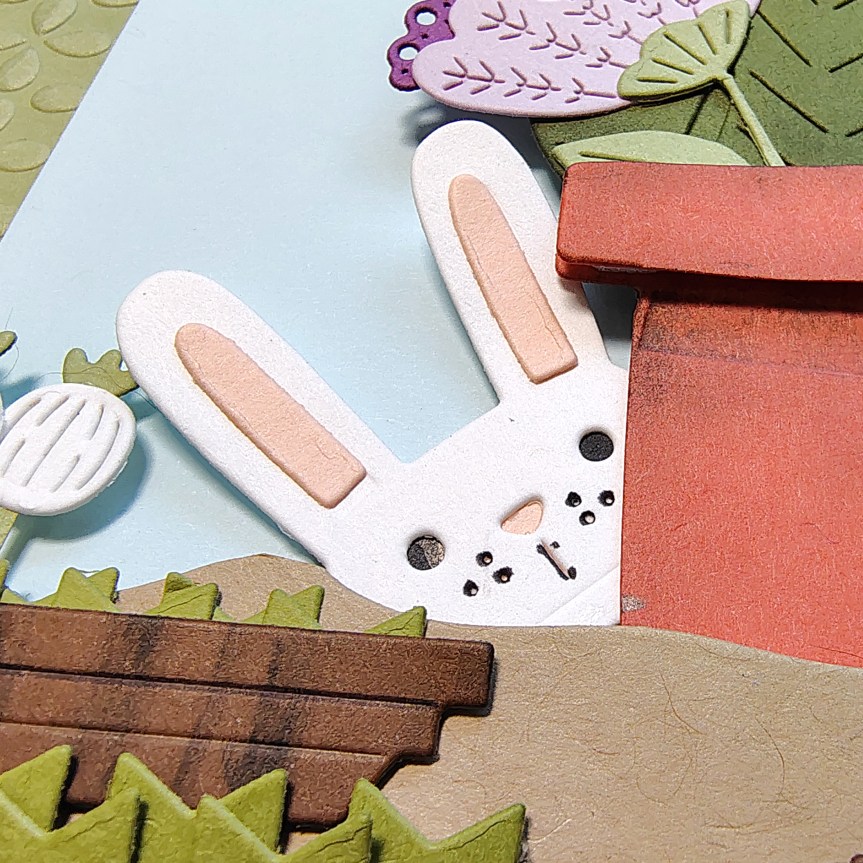
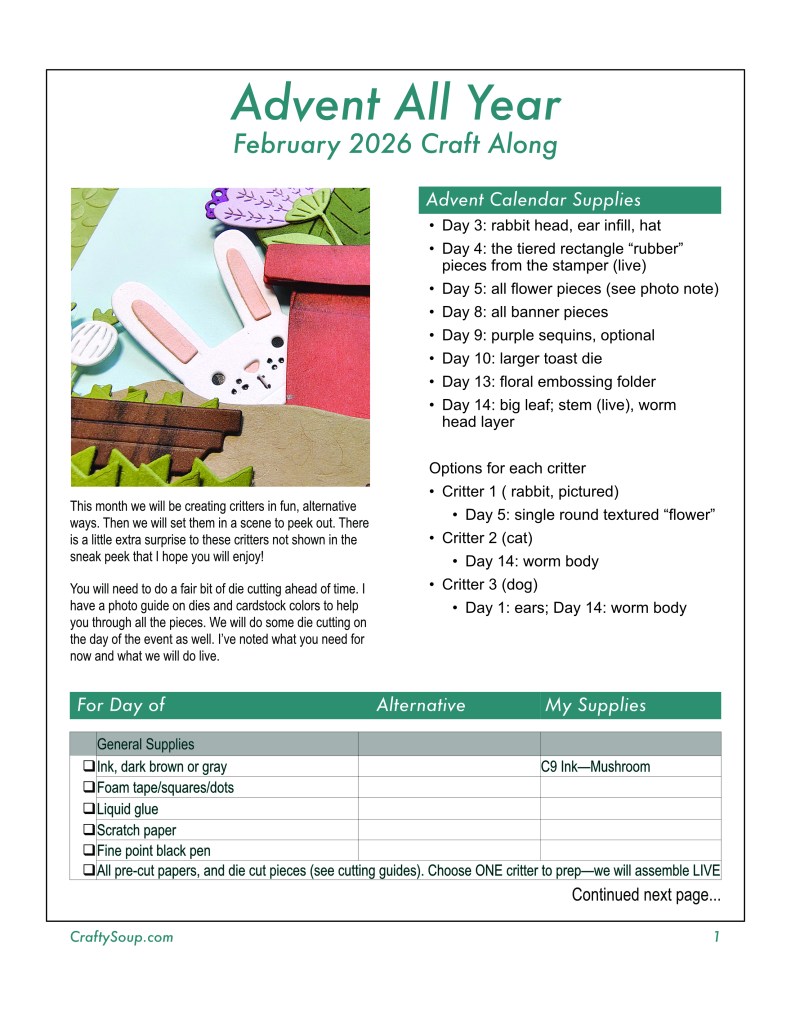
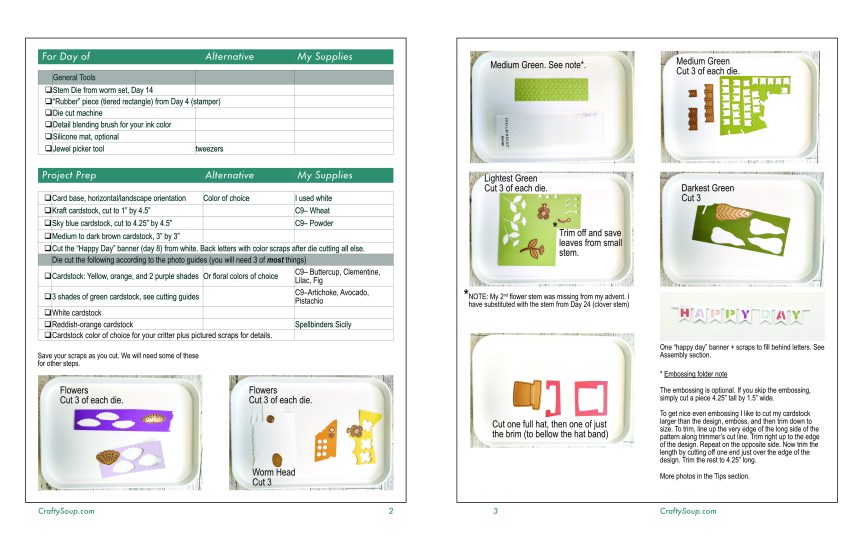
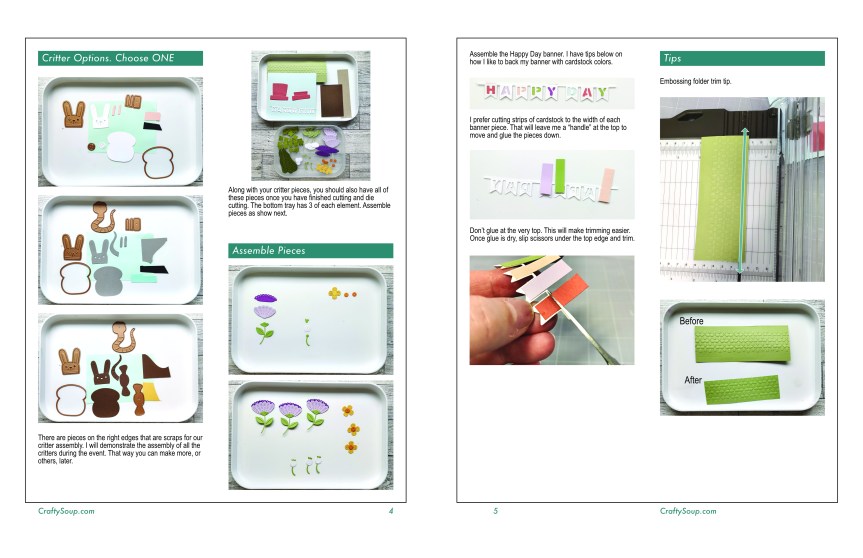
This month we will be creating critters in fun, alternative ways. Then we will set them in a scene to peek out. There is a little extra surprise to these critters not shown in the sneak peek that I hope you will enjoy!
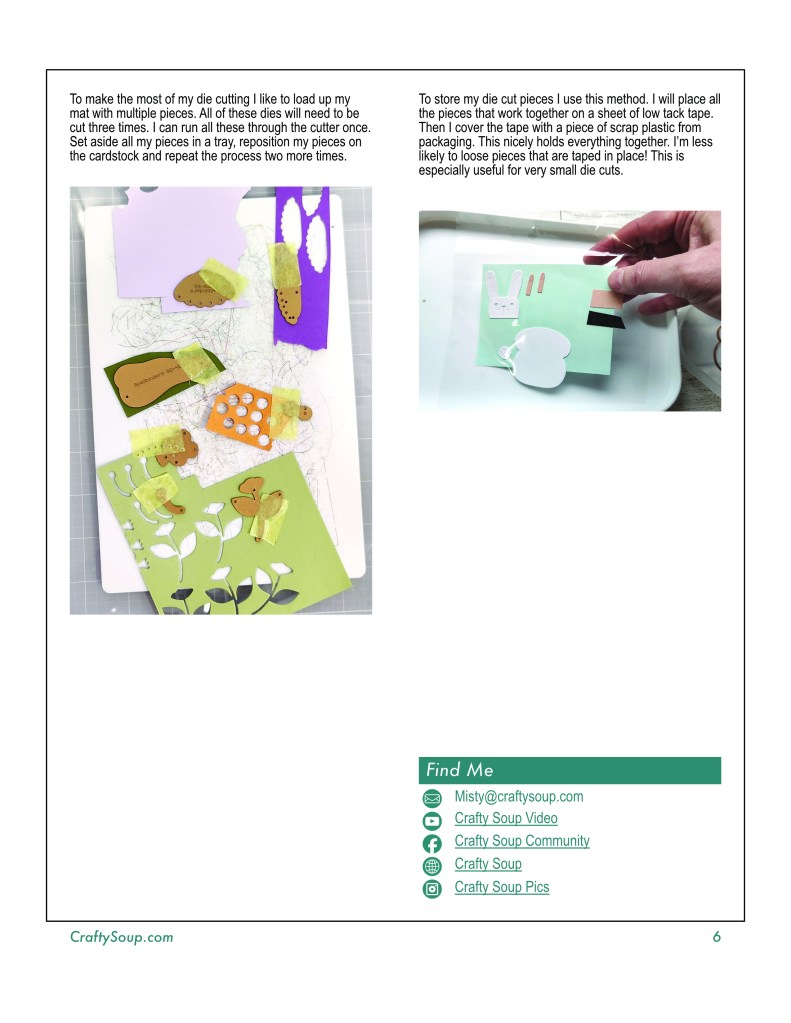
You will need to do a fair bit of die cutting ahead of time. I have a photo guide on dies and cardstock colors to help you through all the pieces. We will do some die cutting on the day of the event as well. I’ve noted in the preparation instructions what you need for now and what we will do live.
If you want to craft along with me, here is a preview of the preparation list. Click this link to download the instructions. A zip file will download. The folder includes PDF and JPG files.
If you have any questions or comments, you can message me here on the blog from the Contact tab. Or you can email me by using misty at craftysoup dot com. I’ll do my best to get back to you in a timely fashion. Hope to see you on the 27th.
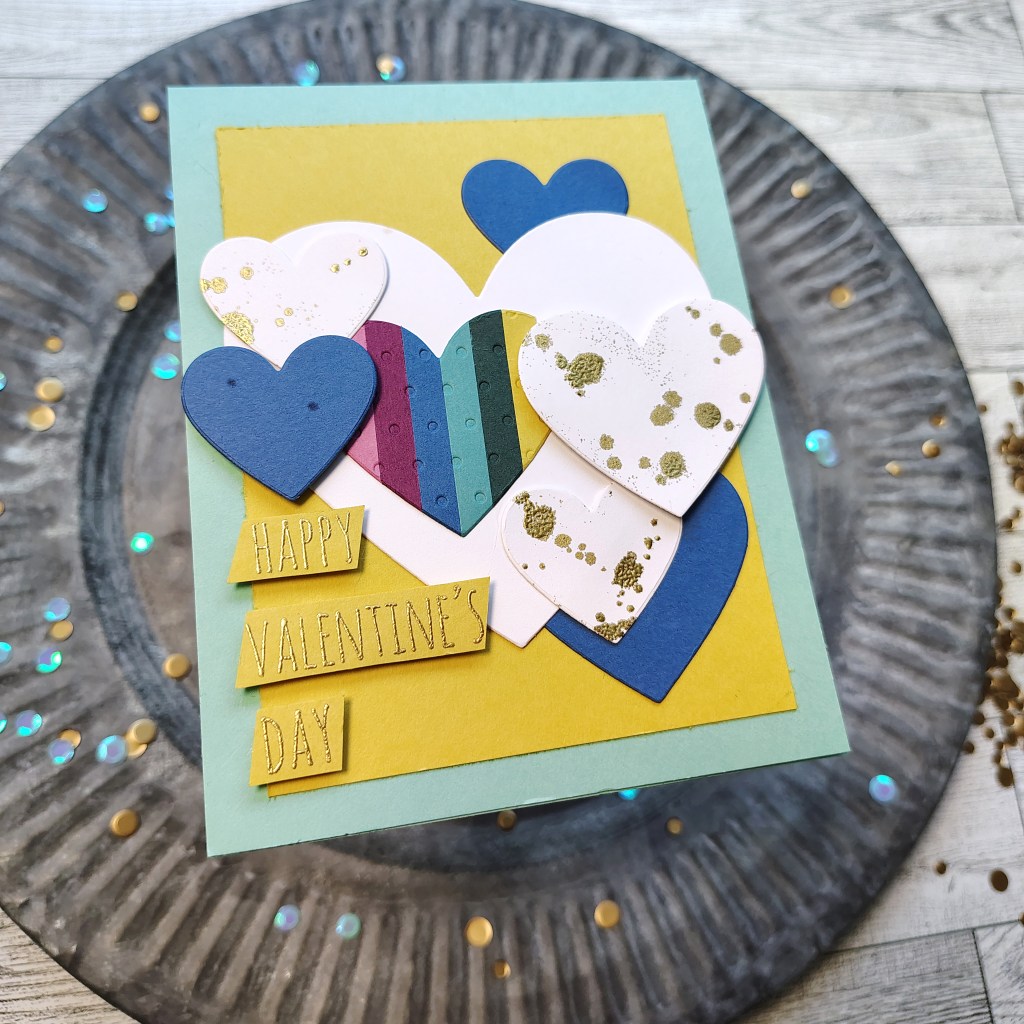
Valentine’s Day is fast approaching! If you haven’t already created your cards, I’ve got some ideas to share. I wanted to add techniques and ideas you can use all year long. Starting with three basic supplies, a modern color palette that steps away from the traditional, and a solid design principle means we have the recipe for many lovely cards.
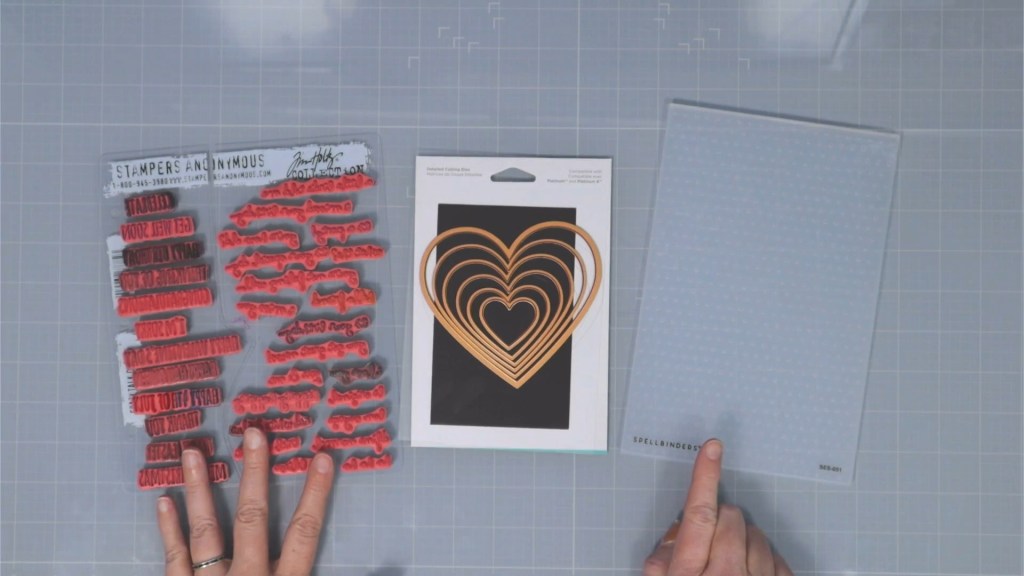
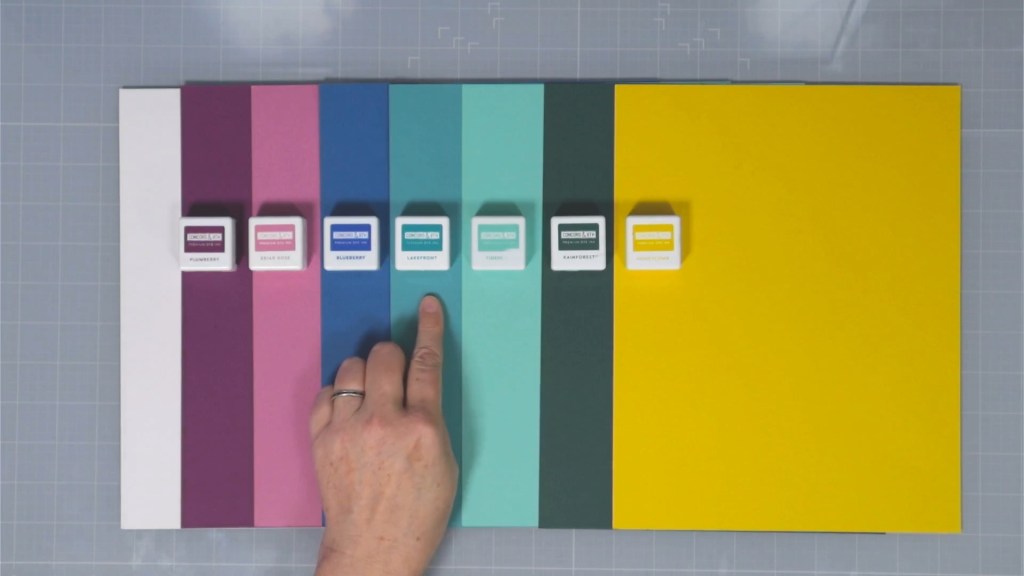
Products
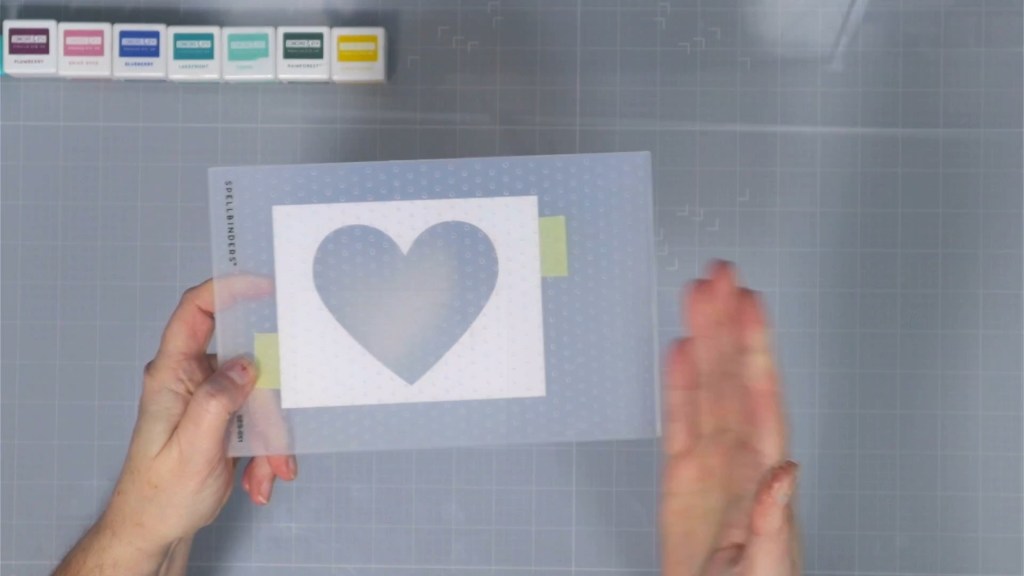
I started with a sentiment stamp set that can be created for a Gal-entine’s sentiment or for more typical Valentine’s. I have a nested set of heart dies. Having different sizes allows for more design options. Finally a simple geometric 2D embossing, in this case polka dots, will add some texture to the designs.
Design Element
My favoite part about these cards is this fresh modern color palette. It is also a great one for masculine cards or for cards that step away from mushy sentimentality. All my colors come from Concord and 9th.
The heart die set is going to give us various ways to play with negative space. Often we will cut shapes and then use that shape. But if we use the hole left behind from cutting, we get different design options.
The Cards
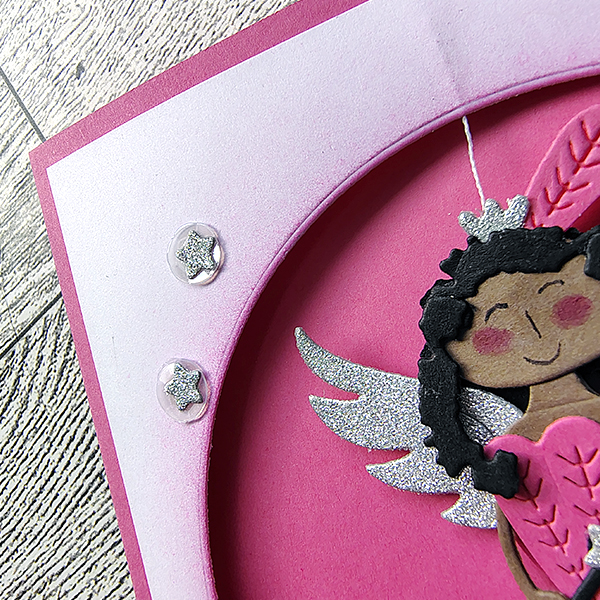
The most common way to use a negative space is to create a shaker card. And that is where I started my creations. I’ve leaned int more of the pinks for this Gal-entine’s card. But I have kept it more modern by including yellow and aqua.
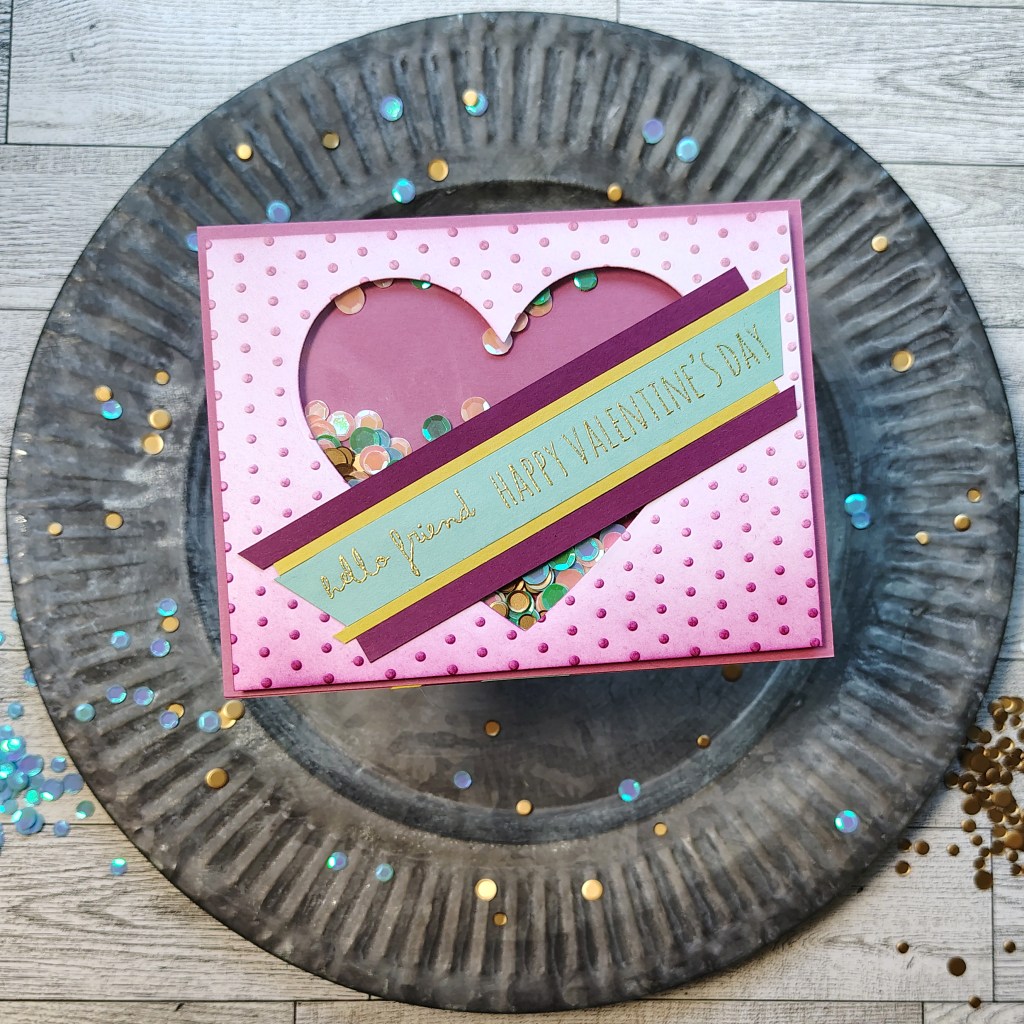
Card two plays with negative space in a very different way.
After creating a striped panel, I cut out the heart but let it overhand the edges to get just a partial negative space left behind. The I filled in the space with the sentiment. I adore this one!
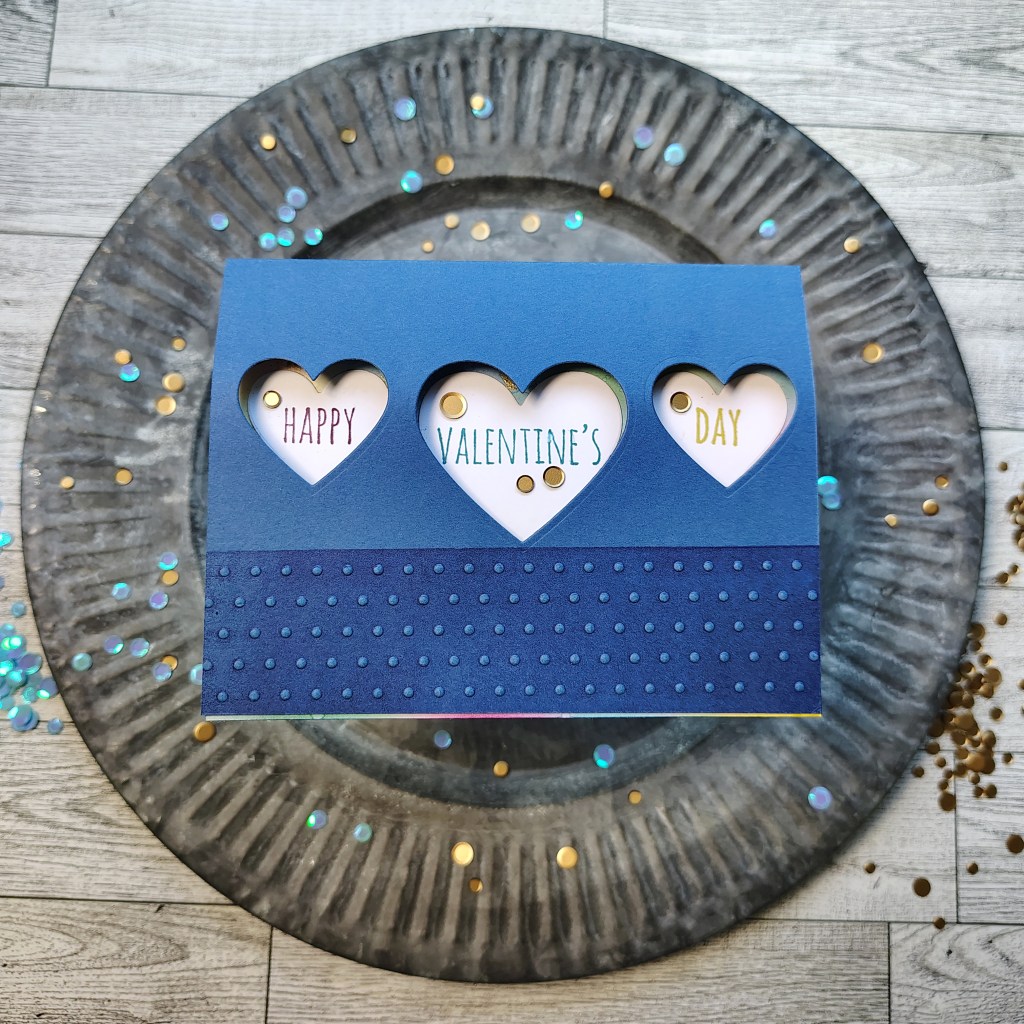
Card three looks simple at first glance. The hearts are cut to reveal some other elements. However, when the card is open, there is a pretty surprise.
I also have an interesting technique happening with the gold splatters. If you want to know more about that, check out my tutorial video.
Before you go I have a bonus card. When using negative space, there will always be positive shapes leftover. I just can’t let those go to waste. So here is a heart filled card to used up those bits.
Hope you have happy Valentine’s Day crafting! Until next time, have an artful day.
As a design team member over at the Counterfeit Kit Challenge group I play along with as many of our monthly inspiration challenges as I can. The Forgery on the Fourth project is definitely one I enjoy! That is where we see a scrap product we like and set out to recreate it with supplies we already own. So let’s go ahead and dive in to what I have for you this month.
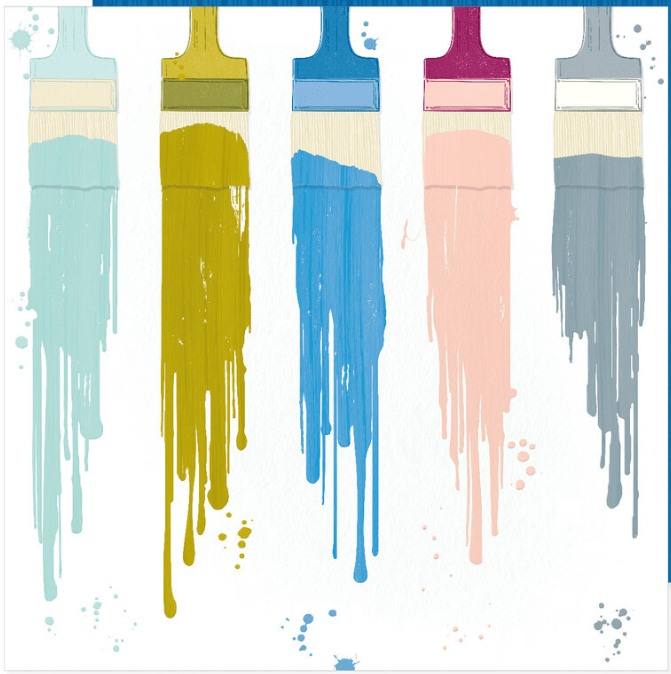
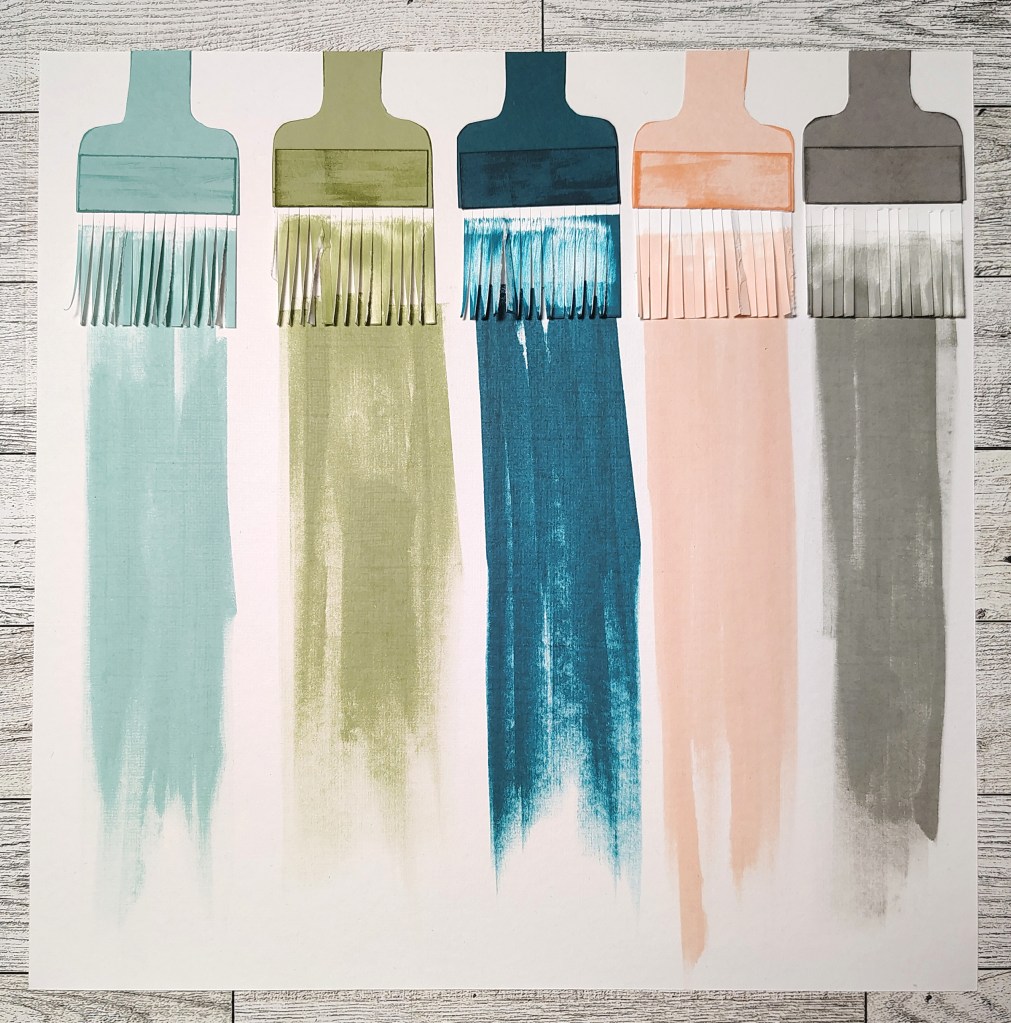
Since we always start our forgery projects with inspiration, here is the image we are working with this month. It is the [kit] from [company].
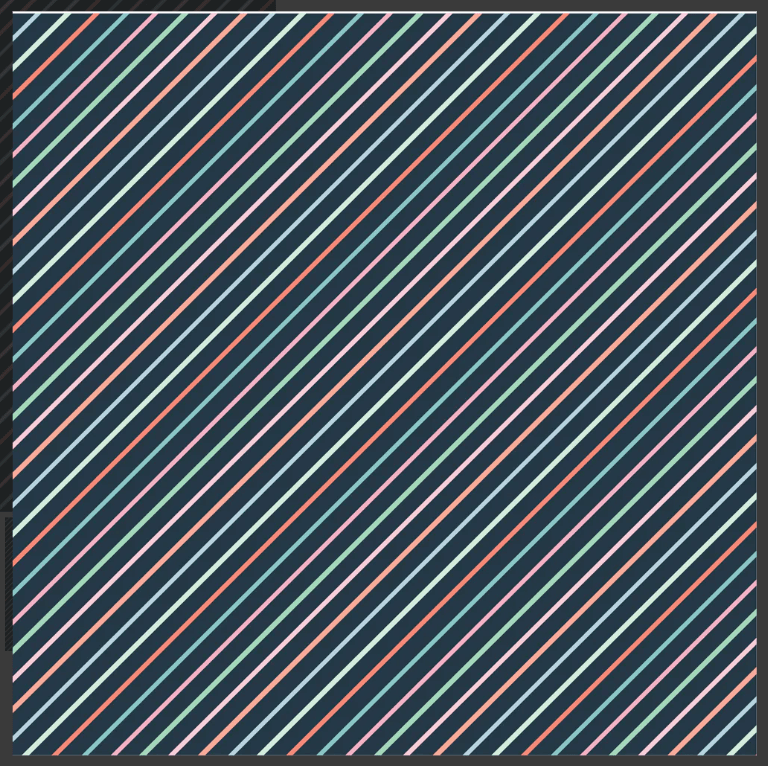
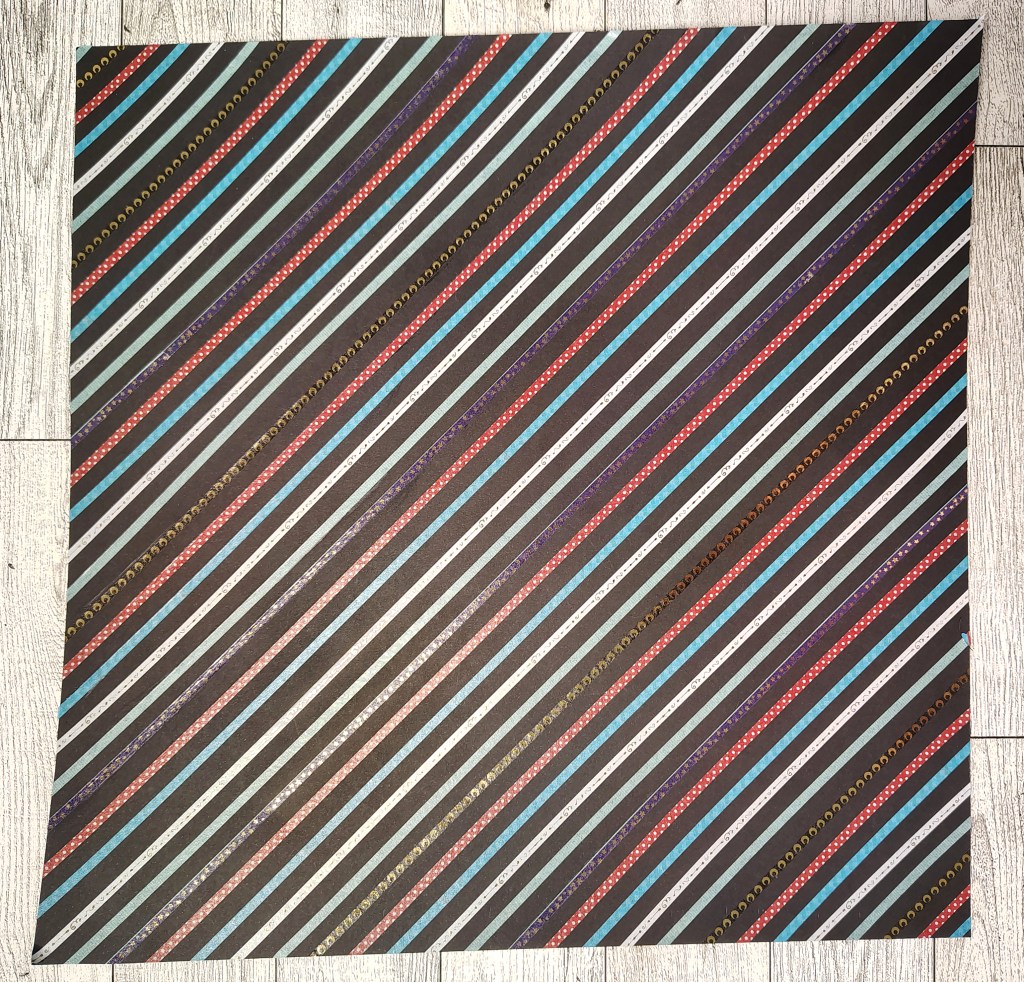
I had two big favorites from this kit. I loved the colorful stipes on black pattern paper from Simple Stories. Then of course I just adored the paintbrush paper from Vicki Boutin. I did have anything like either of these in my stash, so it was time to make my own.
I decided to paper piece and ink my brushes. For the stripes I pulled out my thinest washi tapes and set to work. How do you think I did?
If you want to see more of the process on these, I do have a video tutorial up.
For more creative ideas, the CKC blog has more forgery examples to check out. I hope this gave you some ideas on how you can recreate your favorite product ideas with supplies you may already have on hand. Don’t forget to show off your stuff over on the CKC Facebook group, or tag us on Instagram @counterfeitkitchallenge or use #counterfeitkitchallenge.
I love kit building and that is why I am on the design team for the Counterfeit Kit Challenge project. We take an inspiration kit each month and proceed to replicate it, or as we say, counterfeit it. This is a free, friendly group that helps inspire you to use up supplies you already own. We are not about needing to buy the latest and greatest thing (though we won’t stop you if you enjoy new crafty goodies😉 ).
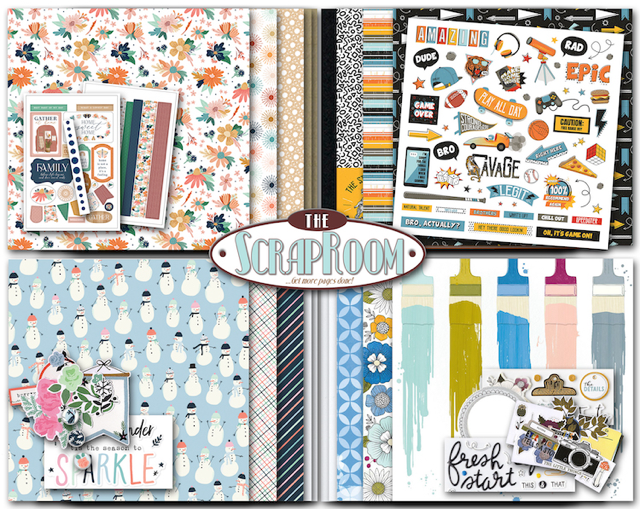
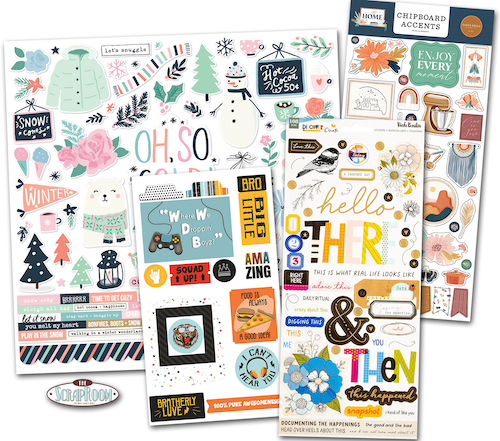
Welcome to a new month of kit building. Amanda is our hostess this time. She chose the January 2024 kit from The Scrap Room to inspire us. Before we dive into the details of this kit, let’s give a warm welcome to our guest designer this month. Kathy Price plays along with our challenge alrady and was happy to join as guest designer this month. She even created this month’s sketch which will be revealed on the 28th! You find find Kathy on her YouTube channel.
Now let’s look at the inspiration. Since this kit is so old, there aren’t many photos to peruse. But try zooming in to get all the vibes from this one.
At first I though I would build one combo kit. But as soon as I reached for paper I found a selection of supplies from Creative Memories that fit perfectly with the upper left corner’s inspiration. So, building four mini kits it is!
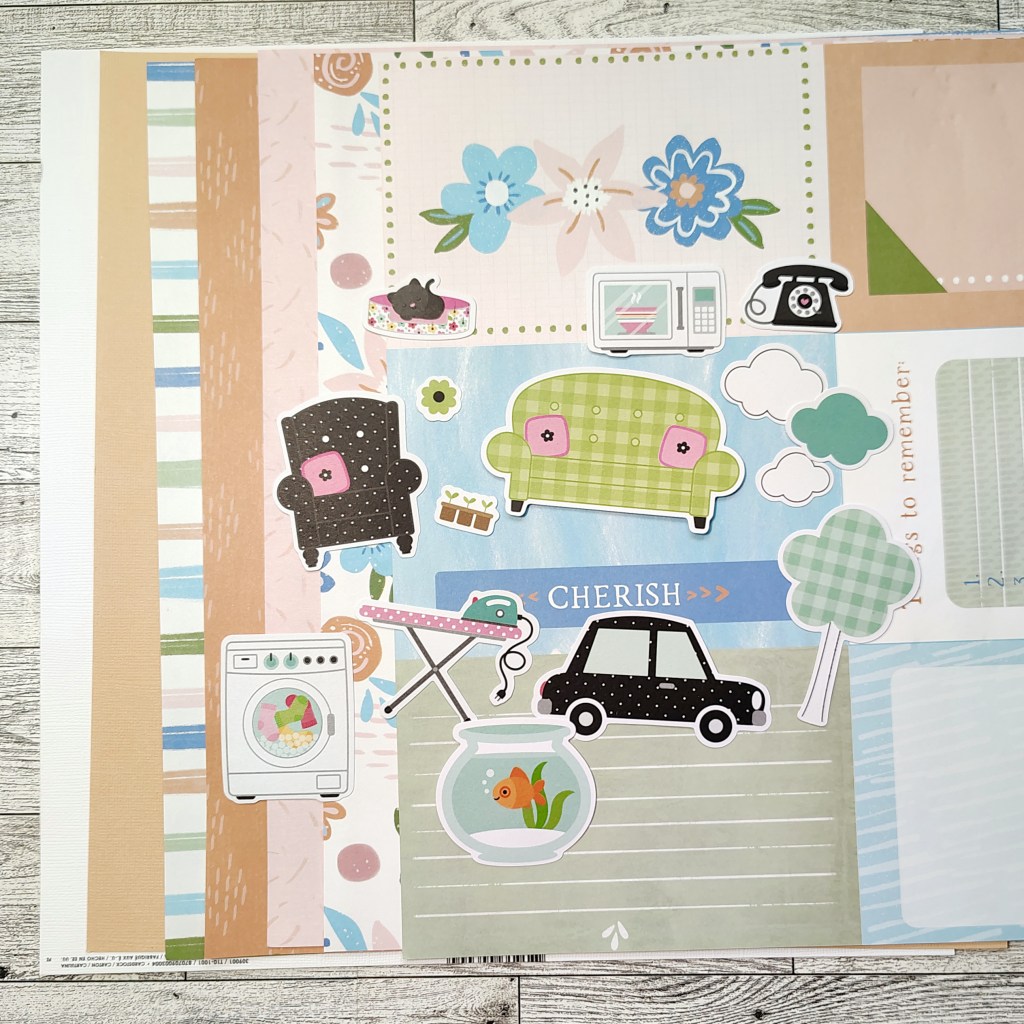
Kit #1: Family
Along with the Creative Memories supplies, I tossed in some homey icons from a pack of Bella Blvd ephemera. Notice the pops of black? That will be a thread that runs throughout my kits.
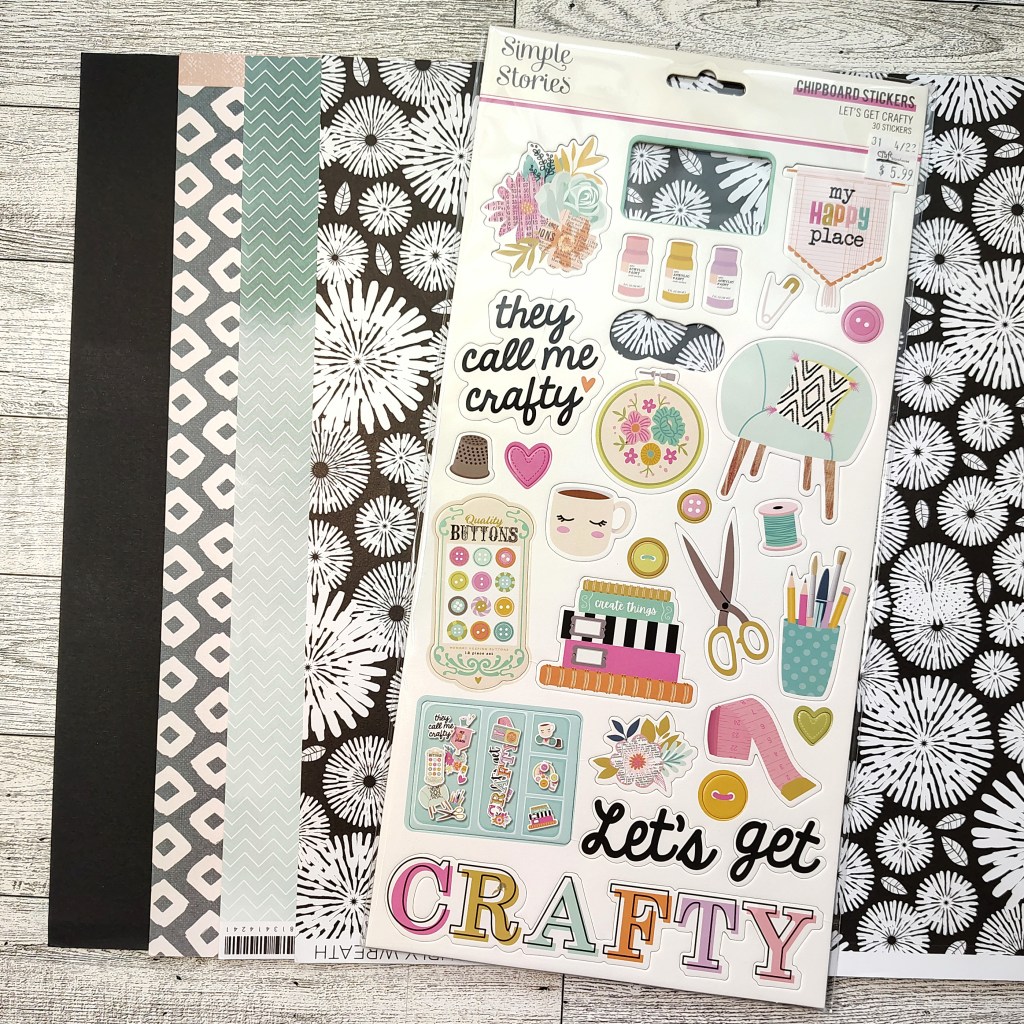
Kit #2: Crafty
This one came from the Vicki Boutin (bottom left corner) inspiration. I went with the mood of the inspo rather than a one to one match. I’ve got florals and gemotrics to capture the vibes. I’ve included a bit of “painterly” craft themed embellishments. Plus, I just may create some of my own items to go with this kit as well. See what I actually make on the 4th!
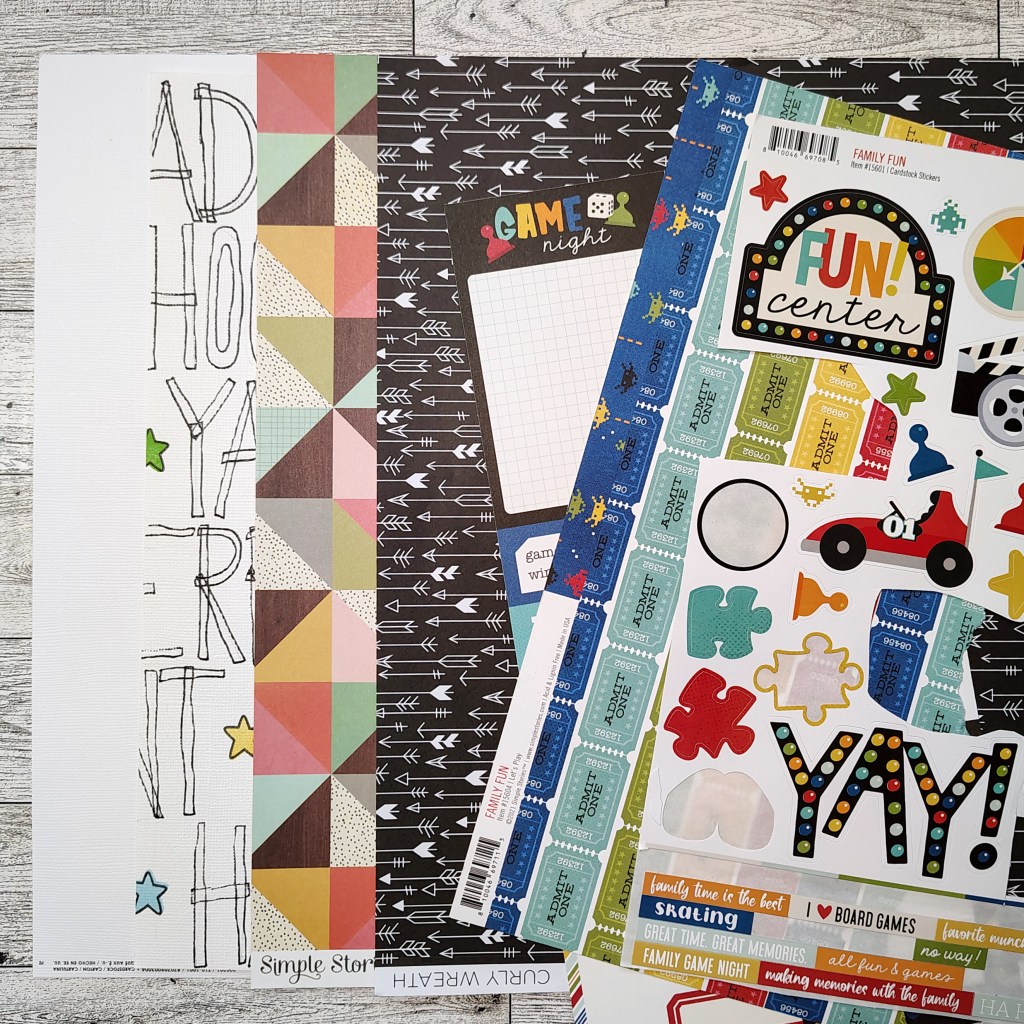
Kit #3: Games
Again, I wanted to capture the energy of the inspo rather than the exact match. Instead of “boy” I switched it up to “games”. I also included the idea of black and white, as well as the bold colors from the pattern papers. This kit will be well connected with the next one…
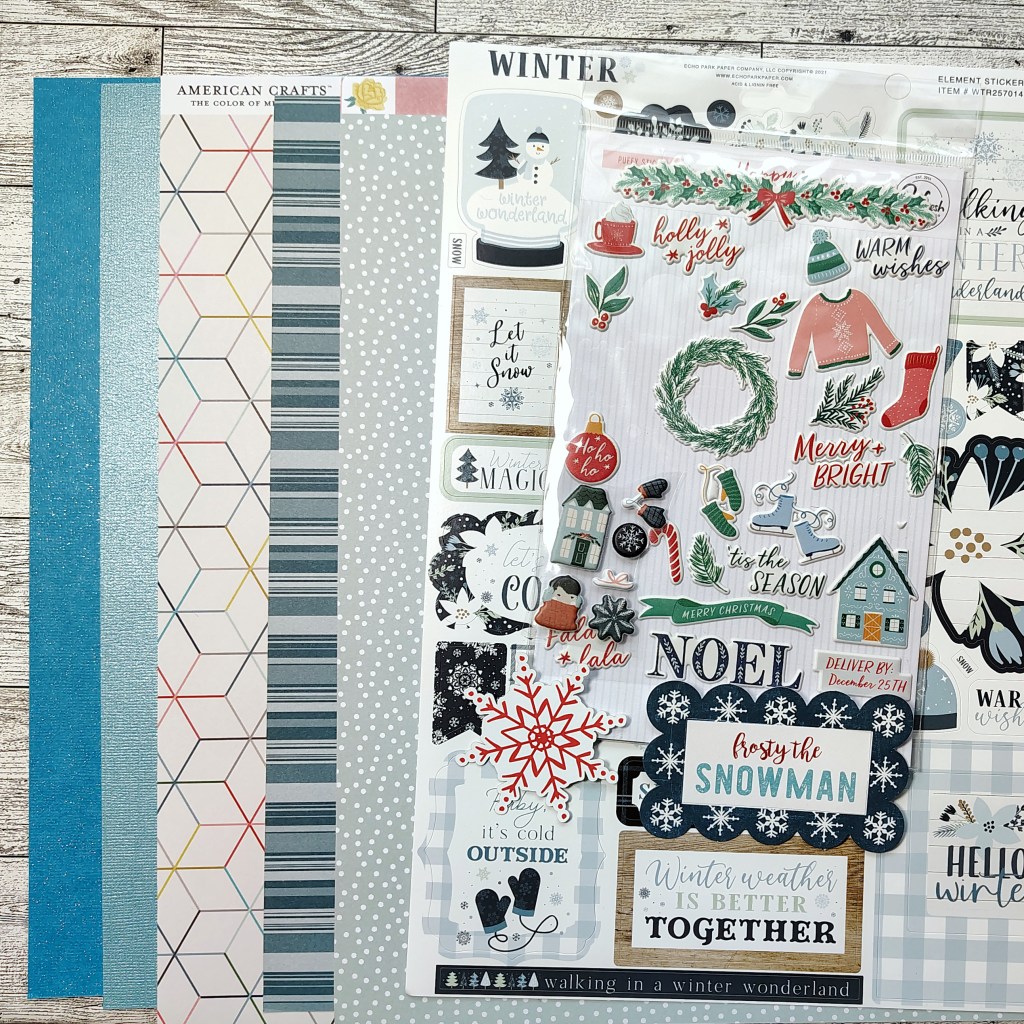
Kit #2: Winter/Christmas
I don’t expect to be able to scrap any fun winter photos this year (no snow for us so far, sniff). BUT, we do play a game each December that is an advent calendar as well! So with the game theme, and some of these winter/Christmas embellishments, I can create layouts for that specific story!
Don’t forget that each month I also create my own elements to add into my kit. Of course these are inspired by the original kit, but often have a twist of their own. So don’t miss what I will make in just a couple of days. I’m loving my ideas this time.
There is a tradition over at CKC of titling our kits just like companies do. With four kits, it may be hard to find one over arching name. But I’ve got it figured out…
Cozy Hobbies
If you want more details on my kit building thought process, check out my kit build video.
I hope you can follow along with the other designers and see how they interpreted their own kits.
I have a free download “worksheet” to help guide you through your own kit build process. It is a printable pdf and there are two worksheets per letter size page. Have fun kit building!
Don’t forget to show off your stuff over on the CKC Facebook group, or tag us on Instagram @counterfeitkitchallenge or use #counterfeitkitchallenge.
I’ll be back on the 4th, for our Product Forgeries. Until then, have an artful day!
Hello, hello! Welcome to the info page for my BRAND NEW livestream series. I’ll be using my Spellbinders Crafty Advent Calendar from 2025 to extend the fun all year long in 2026. I’ll have a live stream on the 4th Friday of every month at 4pm Pacific time. The stream will last between and hour and an hour and a half. This series is also a craft-along!
I will preplan a project, post sneak peeks and post of things you can prep ahead of time if you want to craft live with me. I’ll try to use the advent supplies in a way that may not be super obvious. That way you can get more ideas on using your advent goodies. Hope you will join me.
CORRECTION:
I gave the wrong day of the week. This is the correct day… The January 2026 stream will be on FRIDAY, Jan 23rd at 4pm Pacific. Here is the sneak peek..
If you want to craft along with me, here is a preview of the preparation list. Click this link to download the instructions. A zip file will dowload. The folder includes PDF and JPG files.
If you have any questions or comments, you can message me here on the blog from the Contact tab. Or you can email me by using misty at craftysoup dot com. I’ll do my best to get back to you in a timely fashion. Hope to see you on the 23rd.
I love kit building and that is why I am on the design team for the Counterfeit Kit Challenge project. We take an inspiration kit each month and proceed to replicate it, or as we say, counterfeit it. This is a free, friendly group that helps inspire you to use up supplies you already own. We are not about needing to buy the latest and greatest thing (though we won’t stop you if you enjoy new crafty goodies😉 ).
Welcome to 2026. Not only is it a new month, but is also a new year. Are you ready to get back to kit building? Honestly, I still feel like I have a December “hangover”. LOL. But here we go. Sometimes the best thing to do is just get right back into the flow.
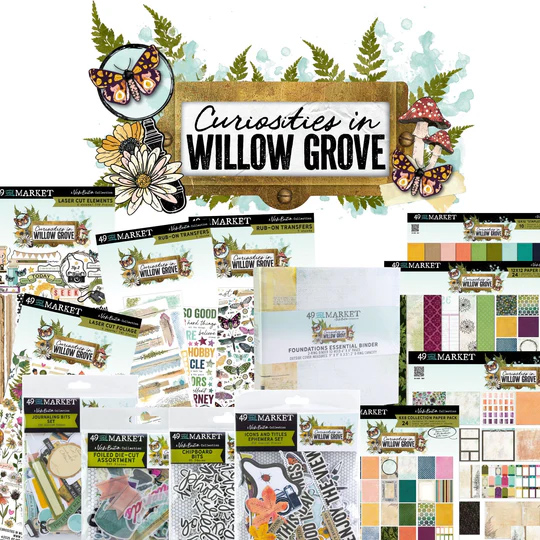
Team member Vikki is our hostess this time. She chose the Curiosities in Willow Grove* collection from Vicki Boutin and 49 & Market to inspire us. Before we dive into the details of this kit, let’s give a warm welcome to our guest designer this month, Melinda Barkman. You can check out her own Facebook group, Busy as a Bee Designs, to learn more.
Now we are ready to take a lookg at our inspiration! Here are a few looks at what we have in store this time around.
This is pretty classic Vicki Boutin. What drew me to this kit are the same things that draw me to all her work: nature, good color, pops of black, mixed media and word phrases that matter to everyday storytelling. Let’s see how that played out in my kit selections
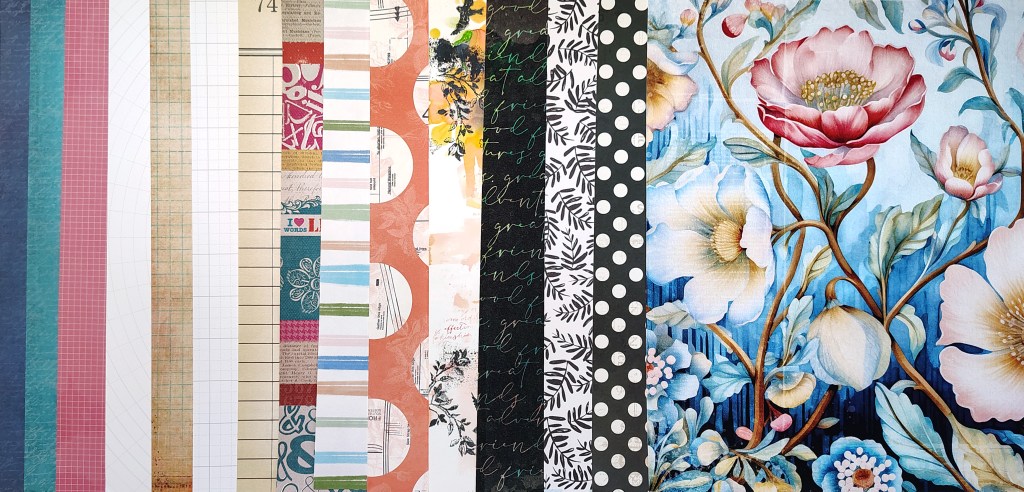
So these are the papers I came up with. I have just one VB paper in there, but found plenty of other manufacturers to vibe with. That bold floral is something I picked up at random on one shopping trip. I have no idea what I’ll do with it, but it is stunning. And VB does love some florals!
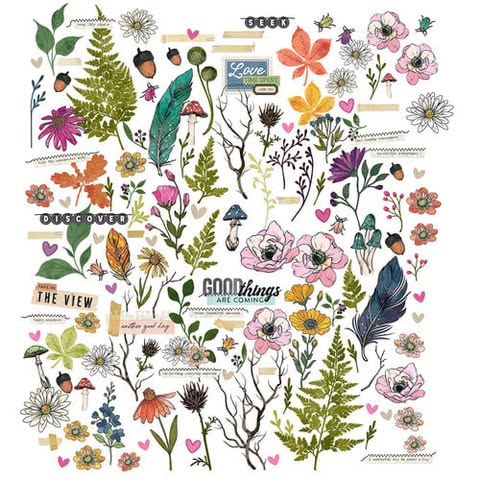
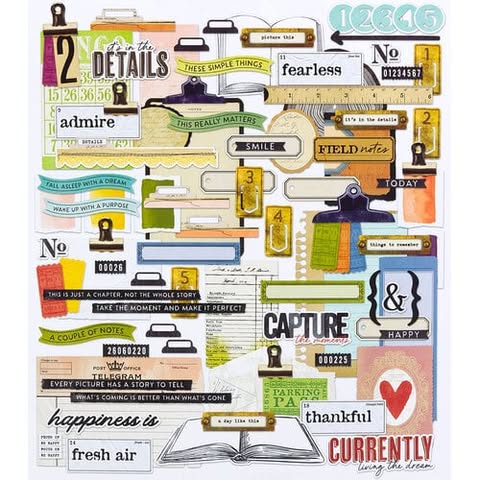
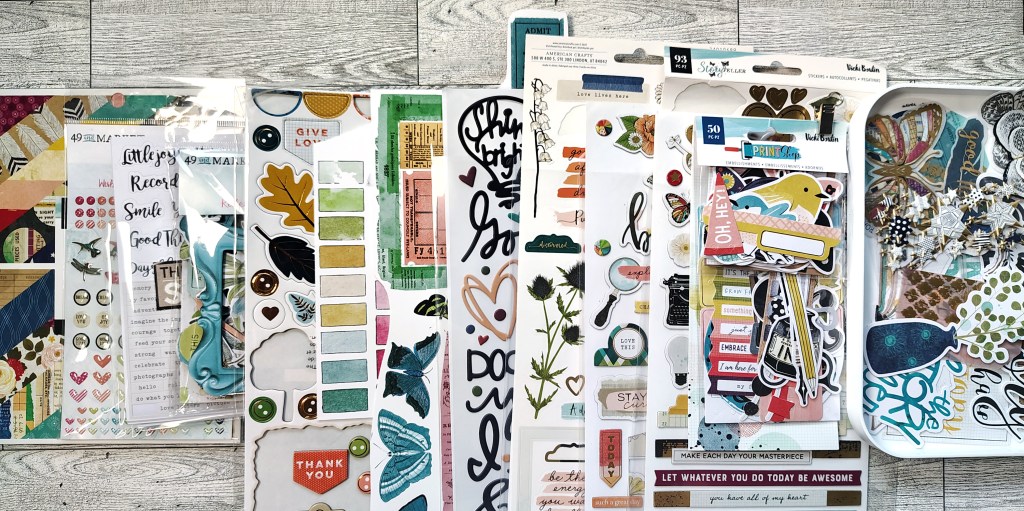
Now, with the embellishments I did dive heavily into my VB stash. I found similar icons in many of her previous collections. From typewriters to thistle, there is a bit of everything in my embellishments. I will never use all these pieces, but I find it easier to grab the entire package even when I only want one or two elements.
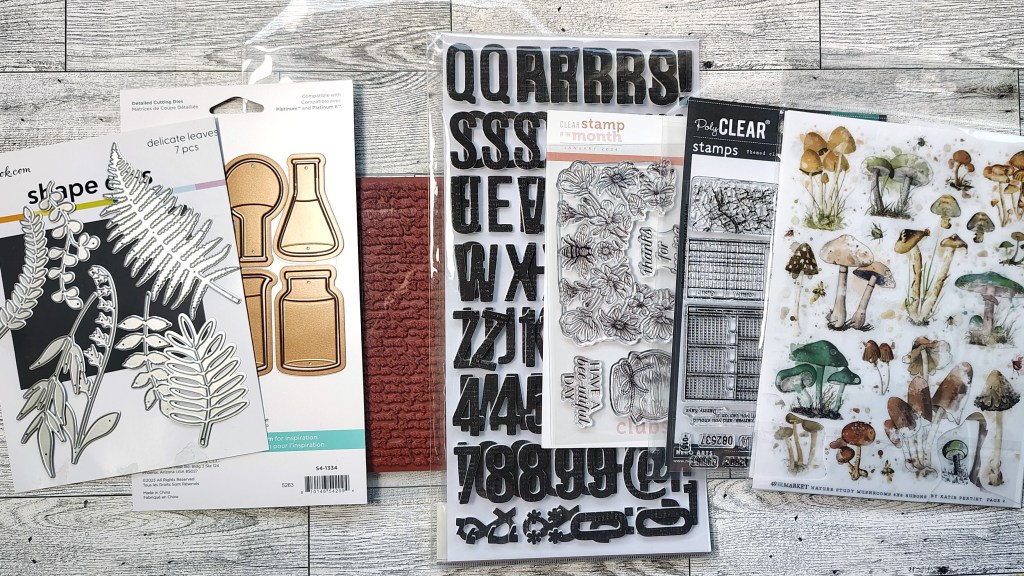
Can’t forget elements for mixing the media. So I have stamps and dies as well. My alpha and rubons ended up here since I forgot it in the above photo!
Don’t forget that each month I also create my own elements to add into my kit. Of course these are inspired by the original kit, but often have a twist of their own. So don’t miss what I will make in just a couple of days. I have simple, but completely DIY friendly ideas.
There is a tradition over at CKC of titling our kits just like companies do. So I’m calling mine…
Nature’s Whispers
If you want more details on my kit building thought process, check out my kit build video.
I hope you can follow along with the other designers and see how they interpreted their own kits.
I have a free download “worksheet” to help guide you through your own kit build process. It is a printable pdf and there are two worksheets per letter size page. Have fun kit building!
Don’t forget to show off your stuff over on the CKC Facebook group, or tag us on Instagram @counterfeitkitchallenge or use #counterfeitkitchallenge.
I’ll be back on the 4th, for our Product Forgeries where I create those DIY elements. Until then, have an artful day!
* I use affiliate links when available, at no extra cost to you. Using my shopping links helps support my work. Thank you!